Mastering Spring Framework:1.1
🧩Setting Up a Spring Boot Project & Understanding the Folder Structure
Introduction
Before writing any controller, service, or repository, it is important to understand how a Spring Boot project is created and how its folder structure is organized.
In this article, we will:
Create a Spring Boot project using Spring Initializr
Import it into IntelliJ IDEA
Understand the default folder structure
Understand the purpose of folders like
controller,service,repository,dto,utils, etc.
This will give us a strong foundation before moving deeper into Spring Boot development
🚀 Step 1: Create a Spring Boot Project Using Spring Initializr
Spring Initializr is an official tool provided by Spring to bootstrap Spring Boot applications quickly.
1. Open Spring Initializr
Open your browser and go to:
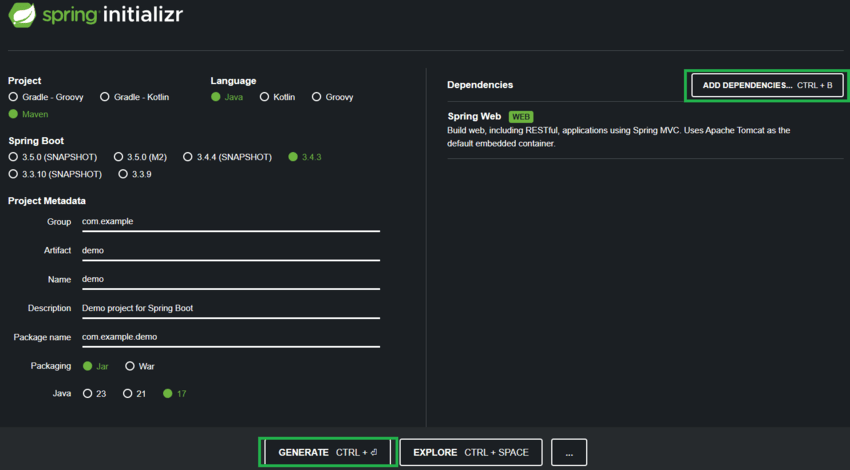
2. Fill in the Project Details
On the Spring Initializr page, fill the details as follows:
Project
Maven (most commonly used)
or Gradle (optional)
Language
- Java
Spring Boot Version
- Select the latest stable version (recommended)
Project Metadata
Group:
com.exampleArtifact:
demoName:
demoDescription: Demo project for Spring Boot
Package Name:
com.example.demo
The group and package name usually follow reverse domain naming.
3. Add Dependencies
Select the dependencies you need. For beginners, you can start with:
Spring Web → for building REST APIs
Spring Data JPA → for database interaction
H2 / MySQL Driver → database (optional at start)
You can always add more dependencies later.
4. Generate the Project
Click on the GENERATE button
A ZIP file containing the Spring Boot project will be downloaded
5. Extract the ZIP File
Extract the downloaded ZIP file
Place it in a folder of your choice on your local machine
🧠 Step 2: Import the Project into IntelliJ IDEA
Open IntelliJ IDEA
Click Open
Select the extracted project folder
IntelliJ will detect it as a Maven/Gradle project
Wait until dependencies are downloaded
Your Spring Boot project is now ready 🚀


📁 Understanding the Spring Boot Folder Structure
Once the project is opened, you will see a structure similar to this:
demo
 ├── src
 │   ├── main
 │   │   ├── java
 │   │   │   └── com.example.demo
 │   │   │       └── DemoApplication.java
 │   │   └── resources
 │   │       ├── application.properties
 │   │       ├── static
 │   │       └── templates
 │   └── test
 │       └── java
 ├── pom.xml
 └── mvnw / mvnw.cmd
Let’s understand each part.
📌 src/main/java
This is where all your Java code lives.
Typical structure inside this package:
com.example.demo
 ├── controller
 ├── service
 ├── repository
 ├── model (or entity)
 └── DemoApplication.java
This is the entry point of the application.
@SpringBootApplication is a combination of:
@Configuration@EnableAutoConfiguration@ComponentScan
It tells Spring Boot:
“Start here, scan packages, create beans, and run the app.”
📌 src/main/resources
This folder contains configuration and static files.
🔹 application.properties
Used for:
Database configuration
Server port
Application-level settings
Example:
server.port=8081
spring.application.name=demo-app
🔹 static/
Contains static files:
CSS
JavaScript
Images
🔹 templates/
Used for server-side rendering (Thymeleaf, JSP).
Mostly used in MVC apps, not pure REST APIs.
📌 pom.xml
This is the Maven configuration file.
It manages:
Dependencies
Java version
Plugins
Example:
<dependency>
    <groupId>org.springframework.boot</groupId>
    <artifactId>spring-boot-starter-web</artifactId>
</dependency>
In real projects, we extend the default structure for better scalability.
com.example.demo
 ├── controller
 ├── service
 │   └── impl
 ├── repository
 ├── entity
 ├── dto
 ├── mapper
 ├── config
 ├── exception
 ├── utils
 └── DemoApplication.java
Now let’s understand why each folder exists.
📌 controller
This folder is for handling outside world incoming HTTP requests and routing them to the right services .Basically it connects our app to users
Handles HTTP requests
Uses
@RestControllerCalls the service layer
Contains no business logic
📌 service
Where your business logic lives. Service interfaces define the logic, while their implementations (usually inside an implementations subfolder) contain the actual code.Keeping interfaces separate from implementations makes your app easier to test, extend, and refactor later.
Contains business logic
Acts as a bridge between controller and repository
Usually marked with
@Service
service/impl (optional)
Interface in
serviceImplementation in
service.implUseful for large applications
📌 repository
The repositories folder contains interfaces that are responsible for data access operations and interacting with the database. These interfaces typically extend Spring Data JPA repositories like JpaRepository that provide built-in CRUD functionality and allow custom query definitions.
Handles database operations
Extends
JpaRepositoryUses
@Repository
📌 entity
Your database blueprints live here. These classes represent your tables using JPA annotations, defining relationships, fields, and even enums when needed. They’re the backbone of your app’s data structure.
Represents database tables
Annotated with
@EntityShould never be exposed directly to the client
📌 dto (Data Transfer Objects)
DTOs (Data Transfer Objects) are your data messengers. They carry structured data between different layers or between front-end and back-end. Keeping them in one place keeps your project clean and avoids mixing internal models with external-facing data.
Used to send/receive data from clients
Protects entities from being exposed
Separate DTOs for:
POST
PUT
GET
PATCH
📌 mapper
Converts DTO ↔ Entity
Can use:
Manual mapping
ModelMapper
MapStruct
Keeps service logic clean.
📌 config
This is where your app-level configurations live. Whether it’s setting up beans, defining global settings, or other custom configs — they all go here in neat, predictable files like AppConfig.
Spring configuration classes
Bean definitions
Security configuration
Mapper configuration
📌 exception
You will have errors so it’s better to handle them properly. This folder contains custom exception classes to manage specific error situations in a clean, predictable way.
Custom exceptions
Global exception handling using
@ControllerAdviceKeeps controllers clean
📌 filters
Filters are used to intercept incoming HTTP requests and outgoing responses, allowing you to perform operations like logging, authentication checks, or modifying requests before they reach controllers. The filters folder contains all the custom filters required in the application like JwtFilter and so on.
📌 utils ⭐ (Important Best Practice)
utils contains reusable helper classes that don’t belong to business logic.
Examples:
Date utilities
String helpers
File helpers
Token generators
Validators
Example:
public class DateUtils {
    public static LocalDateTime now() {
        return LocalDateTime.now();
    }
}
Rule of thumb:
If a class doesn’t clearly belong to controller, service, or repository — it probably belongs in
utils.
🤔 Why This Structure Is Important
Spring Boot follows convention over configuration.
Benefits:
Clean separation of concerns
Easy scalability
Easier testing
Better readability
Industry-standard structure
Interview-friendly design
✅ Conclusion
Setting up a Spring Boot project using Spring Initializr is simple, but understanding the folder structure is crucial for writing clean and maintainable applications.
A good folder structure should help you clearly organize so your team can find files faster. It also promotes testing because you can quickly find the files you need to test or debug, and it avoids confusion during issue fixing bugs and updating existing code.
A well-structured project:
Scales better
Is easier to debug
Is easier for teams to work on
Before writing any business logic, always understand where your code belongs.